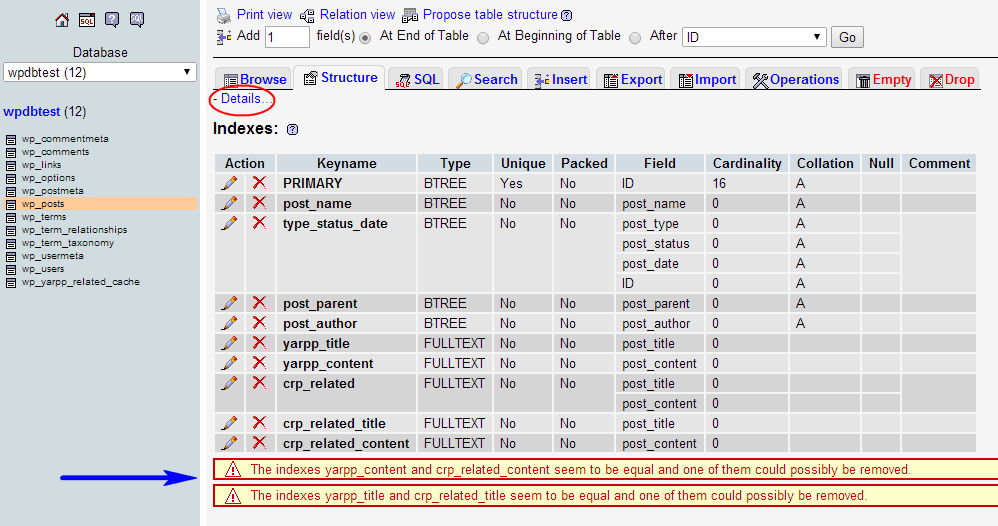
• Home
  • Archives
  • Contact Us

How To : Place Adsense After The First Post »

tag Categories :  Tips,Tricks and Hacks, Tutorials, wordpress tips
time Posted on Friday, July 18, 2008 by Venkat | * Comments(4)

With many way monetize a blog, we need to place our ads in different positions, one place is the right after the first post on the homepage.To place a banner or an adsense ad right after the first post follow these steps.

  • Open your index.php or home.php based on your WP Theme
  • Look for these lines of code

    <?php if (have_posts())

      • Before that add these lines of code

        <?php $count = 1; ?>

    • Next find, this line

    <?php the_content() ?>

  • After that line, add these lines of code

    <?php if ($count == 1) : ?>
    Adsense/Banner Ad Code Goes Here
    <?php endif; $count++; ?>

      You can also change the count value in Step 3 and 5, to 2 if you want to have the ad after the 2nd post.

    1. If you're new here, you may want to subscribe to my RSS feed. Thanks for visiting!

      TEST
      tag Digg This! tag Stumble it! tag Add to Del.icio.us tag Netscape it! tag Google Bookmark It!

      Make Available You Blog In Different Languages »

      tag Categories :  Online Services, Plugins, Tips,Tricks and Hacks, Tutorials, WordPress
      time Posted on Wednesday, July 16, 2008 by Venkat | * Comments(1)

      If your blog is accessible in different languages, even reader of different countries can access your blog in their languages which can improve your pageviews and revenue scope.

      Here’s a javascript code compiled by Amit of Labnol, which uses javascript to translate your website/blog from English to 9 languages,ie., French, German, Italian,Portugese, Spanish, Japanese, Korean, Simplified Chinese, and Arabic.

      <form action="http://www.google.com/translate" >
      <script language="JavaScript">
      <!--
      document.write ("<input name=u value="+location.href+" type=hidden>")
      // -->
      </script>
      <input name="hl" value="en" type="hidden">
      <input name="ie" value="UTF8" type="hidden">
      <input name="langpair" value="" type="hidden">
      <input name="langpair" value="en|fr" title="French" src= "http://photos1.blogger.com/img/43/1633/320/13539949_e76af75976.jpg" onclick="this.form.langpair.value=this.value" height="20" type="image" width="30">
      <input name="langpair" value="en|de" title="German" src= "http://photos1.blogger.com/img/43/1633/320/13539933_041ca1eda2.jpg" onclick="this.form.langpair.value=this.value" height="20" type="image" width="30">
      <input name="langpair" value="en|it" title="Italian" src= "http://photos1.blogger.com/img/43/1633/320/13539953_0384ccecf9.jpg" onclick="this.form.langpair.value=this.value" height="20" type="image" width="30">
      <input name="langpair" value="en|pt" title="Portuguese" src= "http://photos1.blogger.com/img/43/1633/320/13539966_0d09b410b5.jpg" onclick="this.form.langpair.value=this.value" height="20" type="image" width="30">
      <input name="langpair" value="en|es" title="Spanish" src= "http://photos1.blogger.com/img/43/1633/320/13539946_2fabed0dbf.jpg" onclick="this.form.langpair.value=this.value" height="20" type="image" width="30">
      <input name="langpair" value="en|ja" title="Japanese" src= "http://photos1.blogger.com/img/43/1633/320/13539955_925e6683c8.jpg" onclick="this.form.langpair.value=this.value" height="20" type="image" width="30">
      <input name="langpair" value="en|ko" title="Korean" src= "http://photos1.blogger.com/img/43/1633/320/13539958_3c3b482c95.jpg" onclick="this.form.langpair.value=this.value" height="20" type="image" width="30">
      <input name="langpair" value="en|zh-CN" title="Chinese Simplified" src= "http://photos1.blogger.com/img/43/1633/320/14324441_5ca5ce3423.jpg" onclick="this.form.langpair.value=this.value" height="20" type="image" width="30">
      <input name="langpair2" value="en|ar" title="Arabic" src= "http://photos1.blogger.com/blogger/3709/485/1600/arabic-flag.gif" onclick="this.form.langpair.value=this.value" height="20" type="image" width="30" />
      </form>

      Note:If you copy-paste the code, and you get any errors try to retype the quotes in the JavaScript Code.Also if you want to use the try uploading the flags to your server.

      If you are Wordpress you can try out the Global Translator plugin which can automatically translate your blog in the following different languages: English, French, Italian, German, Portuguese, Spanish, Japanese, Korean, Chinese, Arabic, Russian, Greek, Dutch, Norwegian, Bulgarian, Czech, Croat, Danish, Finnish, Hindi, Polish, Rumanian and Swedish.global-translator

      Features :

      1. Four different Translation Engines to choose from : Google Translation Engine, Babel Fish, Promt, FreeTranslations.com
      2. Search Engine Optimized: Uses this prmalink structure www.domain.com/en/mycategory/mypost
      3. Built-in cache to reduce the online connections to the translation engines.
      4. Easily customizable.

      And is also compatible upto WP 2.5.*

      Global Translator : HomePage | Download v 0.9 Release Date May 10 2008

      TEST
      tag Digg This! tag Stumble it! tag Add to Del.icio.us tag Netscape it! tag Google Bookmark It!

      How To : Add Adsense In Wordpress Blogs »

      tag Categories :  Tips,Tricks and Hacks, Tutorials, WordPress, wordpress tips
      time Posted on Tuesday, July 15, 2008 by Venkat | * Comments(3)

      Adsense is the most preferred CPC advertising system, If you started out with Wordpress adding adsense code into wordpress can be a bit confusing.Follow these steps to implement adsense in your wordpress blogs.

      • Obtain your Adsense code from your Adsense Account.
      • Log into your wordpress blog, 
        Click Design Tab,
        Then Click the Theme Editor,
        Click  Single Post (single.php) on the right hand side from the Theme Files
      • If you want the ad below the title of the post,
        Find  this code <div class="postContent"> and place the adsense code right above it. google-adsense-implementation
      • If you want the Adsense ad after the post you have to place the adsense code after the first </div> of the <div class="postContent">

        google-adsense-implementation2

      Wrapping Adsense Around Text

      You can also wrap adsense around the text in the single-post pages.To wrap adsense around the text follow these steps

      To wrap the text to right of the ad, add your adsense code in between these lines 

                <div style="display:block;float:left;margin: 0px 10px 0px 0px;">

               Your Adsense add script

      </div>

      • To wrap the text to the left of the ad, add your adsense code in between these lines.

        <div style="display:block;float:right;margin: 0px 10px 0px 0px;’>

         Your Adsense add script 

         </div>

      TEST
      tag Digg This! tag Stumble it! tag Add to Del.icio.us tag Netscape it! tag Google Bookmark It!

      Wordpress Hack : Span Category Listing Over 2 Columns »

      tag Categories :  Tips,Tricks and Hacks, Tutorials, WordPress, wordpress tips
      time Posted on Monday, July 14, 2008 by Venkat | * Comments(0)

      In some Wordpress Blogs the in the sidebar the category listing are long and take up lot of sibebar space.Here’s a trick that can be used to span the category listing into 2 columns saving more sidebar space.

      category-listing category-listing-spaning

      1.Old Style 2. New Spanning Style

      To get your category listing like that of (2), follow these steps

      1. Open your themes style sheet and add these lines

        .widget { padding:0 0 10px 0;}
        .widget p { padding:2px; }
        .widget h4 { margin:0 0 10px 0; text-transform:uppercase; color:#D90202; font-weight:bold; font-size:10px; border-bottom:1px solid #4cb6fc; border-top:1px solid #4cb6fc; background:#cdeafa; padding:8px 15px; }

        .widget ul { list-style-type:none; padding:0 0 0 10px;}
        .widget li { font-size:12px; padding:6px 0 6px 12px; no-repeat; background-position:0px 12px;}

        .widget li a { font-size:12px; color:#333333; }
        .widget li a:hover {color:#0070b2; }

        .widget.tags { text-align:justify; width:226px; overflow:hidden;}
        .widget.tags a {color:#808080; }

        ul.right {float:right; width:132px;}
        ul.left {float:left; width:120px;}

        .c {clear:both;}

      2. Open your sidebar.php and add for the following lines

        <div class=”widget”>
        <h4>Categories</h4>
        <?php
        $cats = explode(”<br />”,wp_list_categories(’title_li=&echo=0&depth=1&style=none’));
        $cat_n = count($cats) - 1;
        for ($i=0;$i<$cat_n;$i++):
        if ($i<$cat_n/2):
        $cat_left = $cat_left.’<li>’.$cats[$i].’</li>’;
        elseif ($i>=$cat_n/2):
        $cat_right = $cat_right.’<li>’.$cats[$i].’</li>’;
        endif;
        endfor;
        ?>
        <ul class=”left”>
        <?php echo $cat_left;?>
        </ul>
        <ul class=”right”>
        <?php echo $cat_right;?>
        </ul>
        <div class=”c”></div>
        </div>

      3. You can use 4 variations of depth by changing the value of depth in the 4th line of Step 2 to 0,-1,1,2

        0
        - All Categories and child Categories (Default).
        1 - All Categories displayed in flat (no indent) form (overrides hierarchical).
        1 - Show only top level Categories
        n - Value of n (some number) specifies the depth (or level) to descend in displaying Categories
      TEST
      tag Digg This! tag Stumble it! tag Add to Del.icio.us tag Netscape it! tag Google Bookmark It!

      Updated :: Make Your Wordpress Themes Wigitized »

      tag Categories :  Tips,Tricks and Hacks, Tutorials, WordPress
      time Posted on Thursday, July 3, 2008 by Venkat | * Comments(2)

      Most of the themes available now a days are wigitized but there are a few really good ones that are not wigitized.In this tutorial I’ll show how you can wigitize a WP Theme, which can make it really easy to manage the sidebars of a WP Theme.

      To check if your theme is widget ready or not just head to Design -> Widgets.

      WP-no-widgets

      Which means your theme is not widget enable.

      Follow these steps to enable widgets for your theme.

      1. Create a file functions.php in your theme directory.
        <?php

        if ( function_exists('register_sidebar') )

            register_sidebar();

        ?>

        If you want 1 side bar

        [ OR ]

        <?phpif ( function_exists('register_sidebars') )register_sidebars(2);?>

        If you want multiple sidebars.You can replace 2 with any number.
      2. After doing that go to Design -> Widgets and you can find thisWP-widgets
      3. Now displaying the sidebars in your theme, open your sidebar.php present in your template theme, look for the unordered list like in the example below and add this text right after the <ul> tag.
        <?php if ( !function_exists('dynamic_sidebar')

             || !dynamic_sidebar() ) : ?>
      4. And finally close the if loop with the endif before the closing unordered list tag</ul>.<?php endif; ?>
      5. For example like this
      <ul id="sidebar-right">

      <?php if ( !function_exists('dynamic_sidebar')

           || !dynamic_sidebar() ) : ?>

                      <li><h2>Categories</h2></li>

              <?php wp_list_categories(); ?>

          <?php endif; ?>

      </ul>

      NOTE : If you more than one sidebar, the you have to give the sidebar number in the function like this

        <?php if ( !function_exists('dynamic_sidebar')

             || !dynamic_sidebar(2) ) : ?>

      Here the 2 is the sidebar number.If there is no number mentioned then the first sidebar is used.

      UPDATE : Wigitize the footer

      TechUpdates in the comments asked whether the footer can be wigitized.So here’s how we can wigitize the footer

      Step 1: open the functions.php that we created above and add the following lines after the register_sidebar() or register_sidebars(2)

          register_sidebar(Array("name" => "bottomleft"));

          register_sidebar(Array("name" => "bottommiddle"));

          register_sidebar(Array("name" => "bottomright"));

      for Example :

      <?phpif ( function_exists(’register_sidebars’) )

      register_sidebars(2);

      register_sidebar(Array("name" => "bottomleft"));

      register_sidebar(Array("name" => "bottommiddle"));

      register_sidebar(Array("name" => "bottomright"));

      ?>

      Step 2 :Open the theme folder and look for footer.php

                In the file look where the footer div block starts and add these lines

      <?php if ( !function_exists(’dynamic_sidebar’)|| !dynamic_sidebar(’bottomleft’) ) : ?>

      <?php endif; ?>

      The footer div block would look start with something like this

      <div class="footer-box">


      If the footer has some functions by default, you can leave them as is.The wigets will replace the default.

      For Ex.

      <div class="footer-box">

      <?php if ( !function_exists(’dynamic_sidebar’)|| !dynamic_sidebar(’bottommiddle’) ) : ?>

      <ul>

      <?php get_recent_comments(); ?>

      </ul>

      <?php endif; ?>

      </div>

      TEST
      tag Digg This! tag Stumble it! tag Add to Del.icio.us tag Netscape it! tag Google Bookmark It!

      Link To Old Posts Easily With RB Internal Links »

      tag Categories :  Plugins, Tips,Tricks and Hacks, Tutorials, WordPress
      time Posted on Friday, June 27, 2008 by Venkat | * Comments(0)

      Linking to internal posts is good for SEO but can be at times really a pain if you don’t know the permalink of the post, you will have to search through the published posts list to find out the permalink of the post.RB Internal Links can really ease the way you link to old posts from newer posts.

      RB Internal Links is a wordpress plugin lets you easily link to posts and pages within their wordpress blog without having to enter the full URL , It uses wiki style tags to define a link to the post or page.The wiki code can be inserted manually or by using the wysiwyg plugin.

      INSTALLATION :

      1. Download rb-internal-links plugin from here.
      2. Upload the “rb-internal-links” folder to your wp-content/plugins/ directory.
      3. Activate the plug-in
      4. Browse to Options > RB Internal Links to take a look at preferences

      Note : For this plugin to work you need the Rich Editing Enabled and wysiwyg enabled in your wordpress installation.

      To manually link a page/post:
      At the place you would like the link to appear write

      <!`--{post id="post-slug/post-id" text="link text"--`>
      removing the tick (`) if you copy pasting from here.
      rbinternal_wysiwyg_edit 

      Using the tinymce wysiwyg editor:

      • Make sure you’ve ticked “enable wysiwyg editor” on the plugin preferences page.
      • Select the text for which you want to link.
      • A new icon will appear on the wysiwyg toolbar, it looks like a page with a link over it Clicking on the icon will pop-up a toolbox. [ Image 1  ]
      • Select the category the post you need is in or alternatively, choose pages for a list of pages
      • Click on the post or page you wish to link to  [ Image 2 ]
      • Fill in the optional properties for the link  [ Image 3 ]
      • Click “Insert Link”

      rbinternal_wysiwyg_edit2        

                                                       Image 1

           rbinternal_wysiwyg_edit3    

                                                   Image 2

                   rbinternal_wysiwyg_edit4

                                                    Image 3

      WP 2.5.1 does not show the post id’s, so only the post-slugs can be used, which can also be a bit a bit hard to find.I feel the TinyMCE WYSIWUG Editor is the better way of using this plugin.

      I think this plugin should be a part of Wordpress, I hope this makes it into the upcoming versions of Wordpress.

      RB Internal Links  :  Homepage

      TEST
      tag Digg This! tag Stumble it! tag Add to Del.icio.us tag Netscape it! tag Google Bookmark It!


      Add this blog to my Technorati Favorites!

      Enter your email address:

      Delivered by FeedBurner

      'Most Popular Posts in WordPress'

      • How To : Add Adsense In Wordpress Blogs
      • Make Available You Blog In Different Languages
      • How To Get A Featured Post Section In Wordpress Without Any Plugins
      • Wordpress Hack : Span Category Listing Over 2 Columns
      • Link To Old Posts Easily With RB Internal Links
      • Add 125 x 125 AdSpots To Your Wordpress Themes
      • MassivePress - Free Wordpress Magazine Style Theme
      • 3 Free Wordpress Premium Themes
      • Add A Peel Corner To Your Blog
      • qTranslate - Make Your Wordpress Blog Multi-Lingual
    2. RSS Guide To A Carrer Abroad

      • TOEFL : What & Who Needs To Give This Exam
      • GUIDE : How To Book Your GRE Slot
      • What Is GRE and TOEFL ?? Who Needs To Give These Exams
      • Visa Experiences
      • What To Expect On Your Way To USA ?
      • Visa Experience Fall 2008 May 20th
      • Visa Expericence May 22, 2008 Mumbai
      • Fall 2008 : Visa Experiences
      • What Are Emergency Slots ?? Availability and Who Qualifies For Them
      • Steps To Schedule A F1 Visa Interview
    3. TECH YARD Copyright © 2008 | Disclaimer & Privacy Policy | Slick Blue Theme by Kyle Eslick