 When we need to connect 2 or more system we need a Local Area Network (LAN) which requires a Switch, but you can connect 2 systems without a the need of a Switch using a simple called a Cross Over Cable via their Network Interface Card(NIC), without using a hub or switch.You can create a cross over cable on your own, Here’s what you need
You need these tools
- Category 5 Cable
- RJ45 Connectors
- RJ45 Crimper
STEPS To Create A Cross Over Cable:
- Cut one end of the cable, and Untwist the wires (remember the color pairs that are twisted together).
- Align the wires in the following order from left to right.
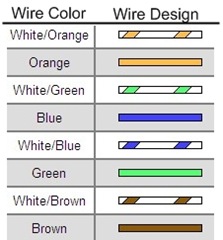
- Insert the sorted and aligned wires carefully into the RJ-45 connector and next
- On the other end of the cable repeat the same procedure as steps 1 and next align the wires in the following order from left to right.
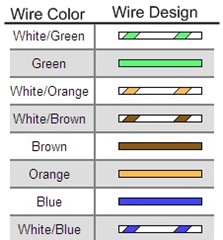
Note : There is a difference is the color order at both the ends.
Insert the cable into the NIC ie, LAN (RJ45 Port ) on both the systems, each on either end to connect them, next you need to setup the systems to communicate with each other.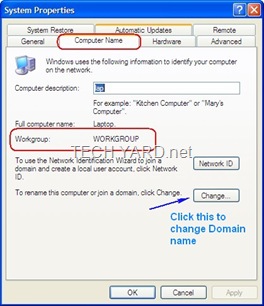
- Make sure both computers are turned off.
- Connect one end of the crossover cable to the network card in computer 1 (it does not matter which end).
- Connect the other end of the crossover cable to the network card in computer 2.
- Turn both computers on.
- In System 1,Right mouse button, click on ‘My Computer‘ and select “Properties”.
- Check “Workgroup” name under ‘Computer Name‘ tab
- Note :The workgroup name should also be the same on Computer2 as well, If not follow Steps 5,6 on System 2.
- Now we have enable ‘Sharing‘ on both computers, to do that
- Open My computer and select the Drive that contains the file that you want to share and Right Click on it and select “Sharing and Security” from the context menu.
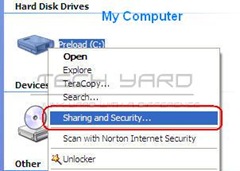
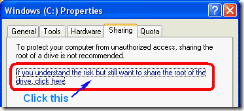
- Under Sharing Tab Click ‘If you understand the risk but still want to share the root of the drive, click here.‘.
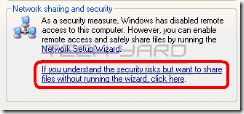
- Next click the highlighted link under “Network Sharing and Security”
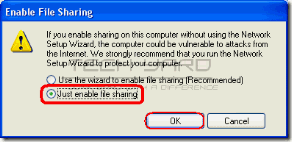
- Select ‘Just enable file sharing‘, and click ok
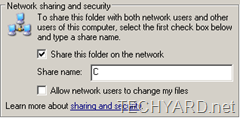
- Now you should notice this under “Network Sharing and Security”, check Share this folder on the network.Check “Allow network users to change my files” if you want other to edit the files you allow access to, Next click OK.
- Folder Permissions will automatically be set.
- Open My Computer, and you’ll notice C Drive is shared and indicated with a hand icon meaning its being shared.
- To keep a folder Private,Open the shared drive and select the folder that you do not want to share, Right click and select “Sharing and Security” and under Sharing tab Select “make this folder private”, else uncheck the box to share the folder with others.
- Go Network Connection Under Network Connections in Control Panel.
- Click “My Network Places” on the left hand side.
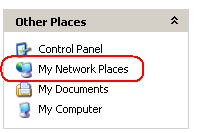
Double-click on one of the computers to view the shared folders / files on it. - Incase this does not work,Add the below configuration to the LAN of Both systems respectively
System 1 – IP address 192.168.0.1 subnetmask 255.255.255.0
System 2 – IP Address 192.168.0.2 subnetmask 255.255.255.0and try 18th step.
If you are running a firewall other than the windows firewall that you configure it on both machines to allow access to one another. Add the IP address of computer 2 into system 1’s firewall safe zone and vise versa. Generally in most cases the IP addresses will be similar to this computer 1: 192.168.1.1 subnet mask 255.255.255.0 Computer 2: 192.168.1.2 subnet mask 255.255.255.0


