
Data backup is very important and if you have website or blog then its very important to keep backup on your webserver and also locally just incase your server drives crashes beyond recovery you can still restore you site to the state until your last backup.Frequency of you backups needs to judged based on how much data is added and in what time interval.For ex. if site or blog is very busy you can consider a backup every 15days or 30days.
The common problem many first time bloggers face is that when they want to shift hosting service providers or plan to move wordpress setups from one server to another is the fear of loosing the permalinks, path to files like images which can break the completely.For such users who are looking for a easier process for moving your wordpress blog around you can try the Duplicator WordPress Plugin which can make a clone of your existing WordPress setup and replicate the same on the new server in just a few clicks.
Steps To Use Duplicator For Creating a Clone of your WP Blog :
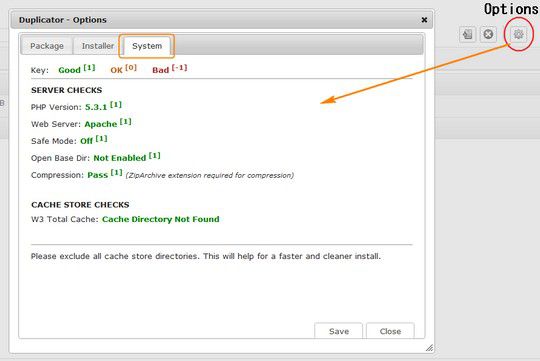
- The first step is to check if your server setup is ok for a smooth and error free cloning process.For doing this check Click the “ Options “ icon and select the “ Systems Tab “. You should see all the checks in GREEN for a smooth clone operation.Click Save to close the options window.

- Now create a package of the wp installation, for this in the Duplicator Page, Enter a " Package Name " and Click the " Create Package " icon, which should initiate the package creation and once complete a new package with its name is listed.

- Next Download the Installer and Package, by clicking on the buttons as shown in the image below.

- Next Copy the Installer and Packager files into the destination folder where you plan to have the clone up and running, for ex. my previous location was localhost/dmc/ and the new location in localhost/dmc_clone/ these 2 folder are under the htdocs or it would be under pubic_html in a real server.Access the path of the new folder from using the URL and you should find the Installer and Package files like in the image below.

- Click on the install.php file to start the process, Once you click the install.php file you should find a new page open which looks similar to the one in the image below.

Settings :
- The Package Name and Package URL are prepopulated
- next click the “GET” for the Install URL which should populate the Installation Path,
- Give the new clone a new Site Title – DMC Clone
Database :
- The host should be prepopulated,
- Enter the Database Name of your choice, and CheckMark – “ Allow DataBase Creation ” so that the new DB is created by the installer.
- Give the DB Username and Password for the Installer to access the MySQL DB and run the required SQL Queries, Test the Connection to your DB using the Test Connection before you start the installation process.
and Finally Agree to the Warnings and Notices and Press the “ Install ” Button, to start the process.
Incase your server does not support ZipArchive Extension, the use the Manual Extraction Method which requires that all contents in the package are extracted to the same directory as the install.php file and checkmark Manual Package Extraction under Settings in the Installer Page.
Also Checkout :
- WordPress Plugins To BackUp and Restore WordPress Installations
- How To Backup WordPress Data On Remote Server Automatically Using iDrive
- How To Secure and Improve Your Blog Load Time
- Once the process is started, after a few minutes you should see the process complete.

Note : As the installation process is going to check at what stage the process is open the install-log.txt in a new tab/window.


Once the process is complete, a few important things :
- Delete the install.php, install-data.sql, install-log.txt & package files if present in the installation folder
- Change the permalink structure as it was in the original setup.
- The username and password for the new setup would remain the same as the original wp setup.
- The Final Step also gives important FAQ to troubleshoot any issues once the installation process is completed.
- Empty out cache from the cache plugins.
The next time your considering moving your site, try duplicator plugin.
Tip : If you want to have a exact copy of your server on your localhost then try making a package of it using the Duplicator plugin and run the installation on your localhost.


